
Remote 3D printing monitoring has become essential for anyone running prints that take hours or even days. Prusa Research recognized this need and developed Prusa Connect, a cloud platform that allows you to monitor and control your 3D printer from anywhere. The platform supports camera integration out of the box, but the options are somewhat limited: you can use Prusa’s own Buddy camera, or repurpose an old smartphone.
While these options work, many of us already have RTSP-capable IP cameras installed in our workshops or homes. These cameras often provide superior image quality, better positioning flexibility, and Power over Ethernet (PoE) support. The question became: why buy another camera when I have perfectly good ones already available?
This is where the idea for this project originated. Prusa Connect exposes a REST API for camera integration, which means we can programmatically send snapshots to the platform. The challenge was bridging the gap between RTSP camera streams and Prusa Connect’s snapshot-based API.
The Solution: Scrypted as a Bridge
Scrypted is a home automation platform that excels at video integration. It can connect to virtually any IP camera, normalize different protocols and formats, and expose them through a unified interface. More importantly, it has a robust plugin system that allows developers to extend its functionality.
The solution architecture is straightforward: create a Scrypted plugin that takes snapshots from existing cameras and uploads them to Prusa Connect at regular intervals. This approach leverages the strengths of both platforms without requiring any custom camera firmware or hardware modifications.
High-Level Architecture
flowchart TB
    Camera["RTSP Camera<br/>(IP Camera)"]
    Scrypted["Scrypted<br/>Platform"]
    Plugin["Plugin<br/>Mixin"]
    MediaObject["MediaObject<br/>Conversion"]
    Buffer["JPEG Buffer"]
    PrusaAPI["Prusa Connect<br/>API<br/>/c/snapshot"]

    Camera -->|RTSP Stream| Scrypted
    Plugin -->| 1.Snapshot Request| Scrypted
    Scrypted -->|2.MediaObject| MediaObject
    MediaObject -->|3.Convert| Buffer
    Buffer -->|4.HTTP PUT| PrusaAPI

    Scrypted -.-> Plugin
    Plugin -.-> MediaObject

    style Camera fill:#e1f5ff,stroke:#01579b,stroke-width:2px
    style Scrypted fill:#fff4e1,stroke:#ff6f00,stroke-width:2px
    style Plugin fill:#fff4e1,stroke:#ff6f00,stroke-width:2px
    style Buffer fill:#e8f5e9,stroke:#2e7d32,stroke-width:2px
    style PrusaAPI fill:#f3e5f5,stroke:#6a1b9a,stroke-width:2px
    style MediaObject fill:#f1f8e9,stroke:#558b2f,stroke-width:2px
The flow is simple:
- The plugin requests a snapshot from the camera through Scrypted’s unified API
- Scrypted handles the RTSP stream connection and captures a frame
- The image is converted to a JPEG buffer
- The plugin uploads the buffer to Prusa Connect via HTTP PUT
- This process repeats at configurable intervals (default: 10 seconds)
Design Decisions
1. The Mixin Pattern
One of the most critical design decisions was using Scrypted’s MixinProvider pattern rather than creating standalone virtual camera devices. A mixin “wraps” an existing device and extends its functionality without replacing it. This approach offers several advantages:
- Non-destructive: The original camera continues to work exactly as before. Other integrations (HomeKit, Google Home, etc.) are unaffected.
- Selective application: You can enable Prusa Connect on only the cameras you want, leaving others untouched.
- Configuration isolation: Each camera can have its own Prusa Connect token and settings, managed independently.
The mixin intercepts the takePicture() method, forwards it to the original camera, then uploads the result to Prusa Connect. From the user’s perspective, the camera gains a new “Prusa Connect” settings section without losing any existing functionality.
2. Token-Based Authentication with Persistent Fingerprints
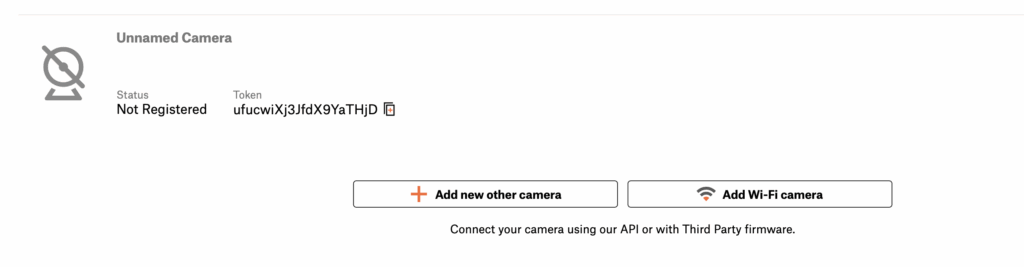
Prusa Connect’s camera API requires two authentication components: a token and a fingerprint. The token is generated when you manually register a camera in the Prusa Connect web interface. The fingerprint acts as a persistent device identifier.
The implementation generates a random 32-character fingerprint on first use and stores it permanently. This fingerprint is sent with every API request alongside the token. This approach ensures that each camera instance maintains a consistent identity across restarts, which is important for Prusa Connect’s rate limiting and device tracking.
private generateFingerprint(): string {
    const chars = "ABCDEFGHIJKLMNOPQRSTUVWXYZabcdefghijklmnopqrstuvwxyz0123456789";
    let result = "";
    for (let i = 0; i < 32; i++) {
        result += chars.charAt(Math.floor(Math.random() * chars.length));
    }
    return result;
}
The fingerprint is generated once and stored in Scrypted’s persistent storage, ensuring it remains constant even if the plugin is restarted or updated.
3. Automatic Camera Info Population
When you configure a camera token for the first time, the plugin automatically gathers and sends camera metadata to Prusa Connect. This includes:
- Camera name
- Manufacturer and model (if available from Scrypted device info)
- Firmware version
- Resolution (detected from video stream options)
This automation eliminates manual configuration steps and ensures that Prusa Connect displays accurate information about your cameras. The implementation gracefully handles missing information, falling back to basic details if full metadata isn’t available.
Key Components Explained
PrusaConnectProvider: The Orchestrator
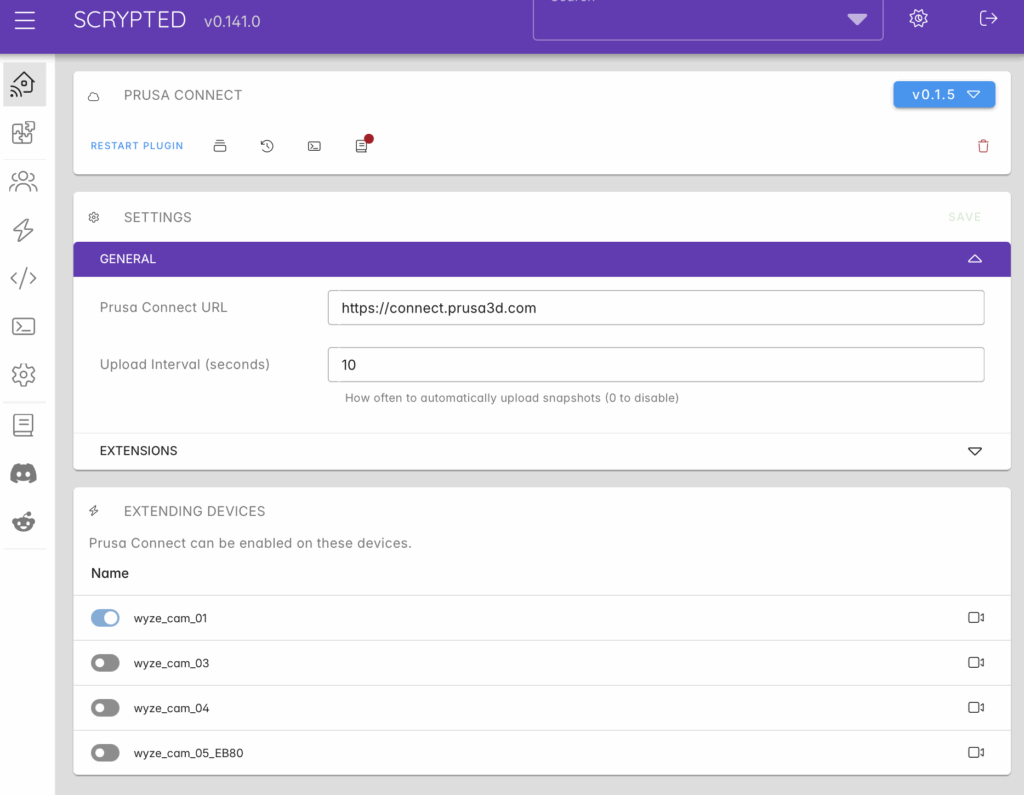
The provider is the main plugin class that manages global settings and coordinates automatic uploads. It maintains a registry of “active” camera mixins (those with configured tokens) and runs a timer-based upload cycle.
Key responsibilities:
- Managing global settings (Prusa Connect URL, upload interval)
- Storing and retrieving per-camera configuration
- Running the automatic upload timer
- Implementing the MixinProvider interface to create camera mixins
The upload interval is configurable, with a default of 10 seconds to align with Prusa Connect’s rate limits. Setting it to 0 disables automatic uploads, allowing only manual “Sync Now” operations.
PrusaConnectMixin: The Per-Camera Extension
Each camera that has the Prusa Connect mixin enabled gets its own instance of this class. The mixin extends Scrypted’s SettingsMixinDeviceBase, which provides the infrastructure for adding custom settings to existing devices.
The mixin implements both the Camera and VideoCamera interfaces, forwarding all calls to the underlying device:
async takePicture(options?: any): Promise<MediaObject> {
    // Get picture from original camera
    const picture = await this.mixinDevice.takePicture(options);

    // Convert to JPEG buffer
    const buffer = await mediaManager.convertMediaObjectToBuffer(
        picture,
        'image/jpeg'
    );

    // Upload to Prusa Connect
    await this.cameraManager.uploadCameraSnapshot(buffer);
    this.lastSync = Date.now();

    return picture;
}
This implementation ensures that taking a picture through Scrypted automatically uploads to Prusa Connect, while still returning the original image to any other caller.
PrusaConnectClient: The API Layer
The client encapsulates all communication with Prusa Connect’s REST API. It uses Axios for HTTP requests and manages authentication headers:
private getCameraAuthHeaders(): Record<string, string> {
    return {
        Token: this.token,
        Fingerprint: this.fingerprint,
    };
}
The client exposes two primary operations:
uploadSnapshot(imageData: Buffer)– Sends JPEG data via PUT to/c/snapshotupdateCameraInfo(cameraRequest)– Updates camera metadata via PUT to/c/info
By isolating API communication in a dedicated class, the implementation remains testable and maintainable. The client could potentially be extracted as a standalone library for other projects.
Settings Storage Architecture
Scrypted provides a flexible storage system, and the plugin uses it in a layered approach:
- Global settings use Scrypted’s
StorageSettingshelper, which automatically generates a settings UI - Per-camera settings are stored by the provider using a
mixin_${cameraId}key pattern - The provider acts as a storage intermediary, allowing mixins to persist their configuration
This architecture ensures that configuration survives plugin restarts and updates, while keeping settings logically organized.
User Experience Considerations
Manual Token Registration
One deliberate design choice was requiring users to manually register cameras in Prusa Connect’s web interface first. While it would be technically possible to automate this via API, manual registration provides several benefits:
- Users explicitly control which cameras appear in Prusa Connect
- The printer association is clear and intentional
- Token security is maintained (users copy tokens directly from Prusa’s interface)
The plugin’s settings make this process clear, with descriptive text guiding users through token acquisition.
Manual Sync Button
In addition to automatic uploads, each camera’s settings include a “Sync Now” button. This provides immediate feedback during initial setup and allows users to test the integration without waiting for the next automatic upload cycle.
The button is implemented as a settings action that triggers a takePicture() call:
{
    key: 'syncNow',
    title: 'Sync Now',
    type: 'button',
    description: 'Take a snapshot and upload to Prusa Connect',
}
This simple addition significantly improves the configuration experience.
Practical Deployment
Installation and Setup

- Just look for
scrypted-prusa-connectfrom the plugins - Click “Install” button
- The plugin appears in Scrypted’s plugin list as “Prusa Connect”
Once installed, users configure it in two steps:
- Plugin settings: Set the upload interval (default 10 seconds)
- Per-camera settings: Enable the mixin on desired cameras and paste their Prusa Connect tokens
Real-World Performance
In practice, the plugin performs reliably with minimal resource overhead. A 10-second upload interval for multiple cameras generates modest network traffic (typically 50-200KB per snapshot, depending on resolution and JPEG quality).
The mixin pattern means there’s no video stream duplication or transcoding happening. Scrypted captures single frames on demand, which is far more efficient than maintaining continuous streams.
Lessons Learned and Future Enhancements
Lessons Learned
Leverage existing platforms: Building on Scrypted’s camera abstractions eliminated the need to implement RTSP, ONVIF, and dozens of other camera protocols. The plugin focuses purely on the Prusa Connect integration.
Mixins are powerful: The mixin pattern proved ideal for this use case. Users don’t think about “virtual cameras” or complex device management. They simply enable Prusa Connect on existing cameras.
Handle rate limits gracefully: External APIs will enforce limits. Treating them as normal conditions rather than errors improves user experience and system stability.
Potential Enhancements
Several features could enhance the plugin further:
- Variable upload intervals per camera: Some cameras might benefit from more frequent updates than others
- Quality settings: Allow users to configure JPEG compression levels to balance quality and bandwidth
- Conditional uploads: Only upload when motion is detected or during active print jobs
- Multiple printer support: Associate different cameras with different printers automatically
Applicability to Similar Projects
The patterns used in this project apply to many integration scenarios:
REST API bridges: Any platform that accepts image uploads via REST API (surveillance systems, cloud storage, notification services) could be integrated similarly.
Protocol translation: The approach of using Scrypted as a protocol translator works for many scenarios beyond cameras. It handles the complexity of device communication, letting your plugin focus on business logic.
Mixin-based extensions: When you want to add functionality to existing devices without replacement, the mixin pattern provides an elegant solution. This could apply to sensors, locks, thermostats, or any other device class.
Conclusion
This project demonstrates that with the right architectural choices, you can create powerful integrations with minimal code. The Scrypted plugin for Prusa Connect comprises just three core TypeScript files, yet it enables seamless integration between professional IP cameras and Prusa’s 3D printing platform.
The key to success was identifying the right abstraction layer (Scrypted), using appropriate design patterns (mixin), and handling edge cases gracefully (rate limiting). These principles apply broadly to integration projects.
For anyone looking to build similar integrations, the pattern is clear: find a platform that handles protocol complexity, focus your code on business logic, and design for non-destructive extension when possible. The result is maintainable, user-friendly software that solves real problems.
References and Resources
- Scrypted Platform – Open-source home automation and camera integration platform
- Prusa Connect – Official Prusa 3D printer cloud platform
- Prusa Connect SDK – Documentation for Prusa Connect’s printer integration
- Scrypted Mixins Documentation – Guide to the mixin pattern in Scrypted
- Scrypted Prusa Connect – NPM package link
The complete source code for this plugin is available on GitHub under the MIT license. Feel free to adapt it for your own integration needs.
Leave a Reply